
Introduction
Timelines are an effective way to showcase events and time-based content. They are useful in depicting historical events, displaying blog posts, tracking project development events, etc, in a chronological manner. Timeline widget allows you to create beautiful and interactive timelines for your WordPress websites.
In this tutorial, we’ll show you how to display posts or custom content in a timeline format using Elementor Addon Elements.
Key Takeaways
- What the Timeline widget is and how it works
- How to add and customize a timeline in Elementor
- The difference between Post-based and Custom content timelines
- How to style individual timeline cards and layout elements
How Do You Add a Timeline in Elementor?
Step 1: Install & Activate Plugin
In order to use Timeline Widget, you have to first install and activate Elementor Addon Elements Plugin.
Step 2: Add Timeline To Elementor
To begin with first create a page or a template where you want to add the Timeline widget and edit the page with Elementor. Then just drag and drop the EAE – Timeline widget in Elementor. You will see a timeline appear with default settings.

Step 3: Elementor Timeline – Content tab Customization
Skins: In this section, you can select the layout of the Timeline, from the different pre-build layouts. After that, you have to choose the timeline Source like Custom or Post. Select Custom to add custom content in the timeline cards. If you want to display the blog posts in your timeline, then choose Post in the source option. When creating a post timeline, you will get options to filter your post based on categories and tags.
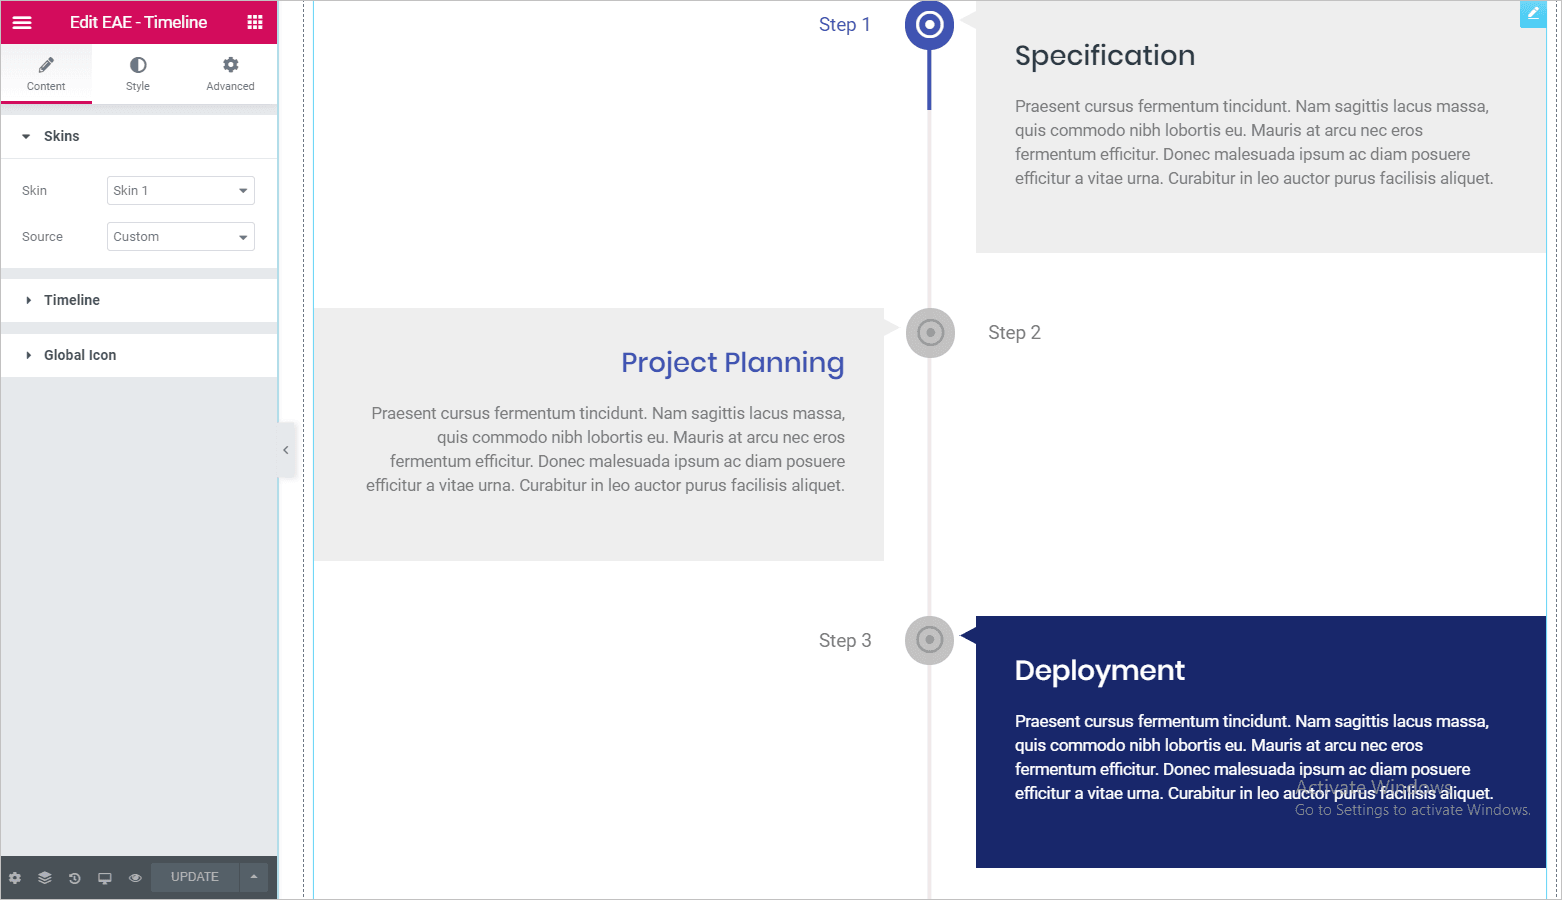
Timeline: In this section, you will see a stack of item boxes. By clicking on these boxes, you can add date, title, image, and content to each card. Here, you can also customize the styling of each card individually by setting different style options for image, card, and icon. You can easily add text content and media files to your timeline cards.
Further, you can also add more items to the timeline, by clicking on the Add Item button.
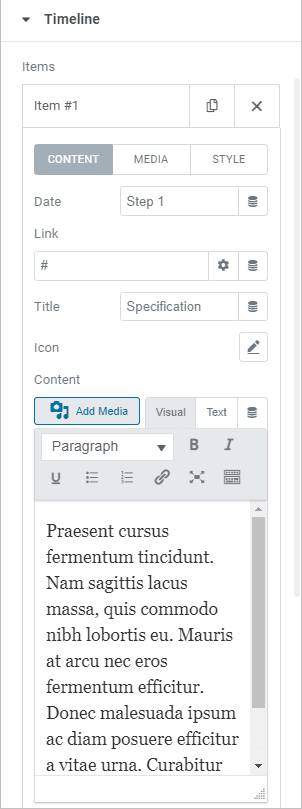
Global Icon: Here, you can also set a global icon for all your timeline cards. Insert an icon from the icon library, an image, or a text.

Step 4: Elementor Timeline – Style Tab Customization
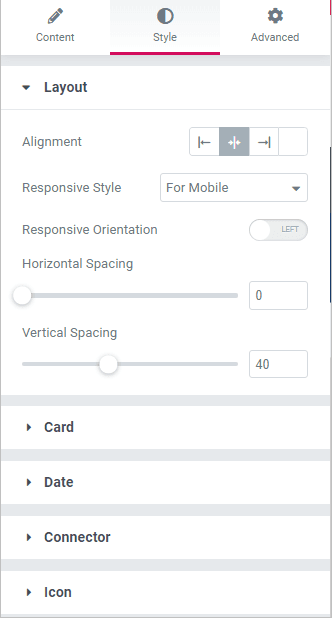
The Style tab gives you various setting options to customize the timeline layouts, cards, date, timeline icon, and connectors. Here you can style each timeline element individually.
Under the Layout setting section, you can change the alignment of the timeline like the left, center, or right. You can also adjust the vertical and horizontal positioning between the cards. Set the timeline responsiveness for the mobile and tablet.
Next, there is a Card setting option that allows you to customize the card settings. Here you can also adjust the image size and spacing. More setting options are available to set the background color, typography, and alignment.
Then in the Date setting section, you can customize the date, you can change the font color, adjust the border-radius, padding, and margins.
Similarly, there are more styling options available to style different sections like Connector, and Icon.
FAQs on Timeline in Elementor
What is the difference between Custom and Post timelines in Elementor?
Custom timelines let you add your own content manually to each timeline card, while Post timelines automatically pull blog post data based on your selected criteria.
Can I display events or milestones using this timeline?
Yes! You can use the Custom source option to add events, milestones, project stages, and more in a timeline format.
Can I customize each timeline card individually?
Yes, you can style each card, image, icon, and text block independently using Elementor’s powerful style options.
Can I use the timeline widget to show blog posts automatically?
Yes, you can use the Post source option in the Timeline widget to automatically pull and display blog posts based on categories, tags, or other filters.
Can I link each timeline card to a specific page or blog post?
Yes, you can include clickable buttons or links in each timeline card to redirect users to detailed pages or posts.
Conclusion
With just a few clicks, you can transform a boring list of posts or events into a visually striking, scroll-friendly timeline. Whether you’re building a blog, an event site, or a personal portfolio, the Timeline widget helps you bring your story to life beautifully and interactively. Try it out and give your content the attention it deserves!
Check out the Demo setup of Timeline widget.


